If you’re a website owner, content creator, social media manager, or just someone who stores hundreds of photos on your devices, you’ve definitely dealt with bulky JPG files. Standard JPG images take up massive storage space, slow down webpage loading speeds, and cause annoying upload delays on social platforms or cloud drives. Manually resizing and converting each photo one by one is incredibly time-consuming and often ruins image quality if you don’t have the right tool. That’s where a JPG to WebP Converter bulk photo compression tool becomes a total game-changer for everyday image optimization.
WebP is Google’s modern image format designed specifically for web and digital use. It offers superior compression compared to traditional JPG files, cutting image size by up to 70% while maintaining crisp, clear visual quality. Unlike single-image converters, bulk compression tools let you process dozens or even hundreds of JPG photos at once, saving you hours of repetitive work. This hands-on guide will walk you through exactly how to use a JPG to WebP converter for bulk photo compression, with simple, actionable steps anyone can follow.

Why Choose Bulk JPG to WebP Compression Over Manual Editing?
Before jumping into the tutorial, let’s break down why switching to bulk WebP compression is worth it for both personal and professional use. Most people stick with JPG out of habit, but the format has major downsides for modern digital needs.
- Massive storage savings: WebP files are far smaller than JPGs with identical visual quality. A 5MB JPG photo can shrink down to 1–1.5MB as a WebP file, freeing up tons of device and server storage.
- Faster loading speeds: Smaller image sizes mean faster webpage load times, smoother social media uploads, and quicker cloud syncs. This also improves user experience and search performance for website owners.
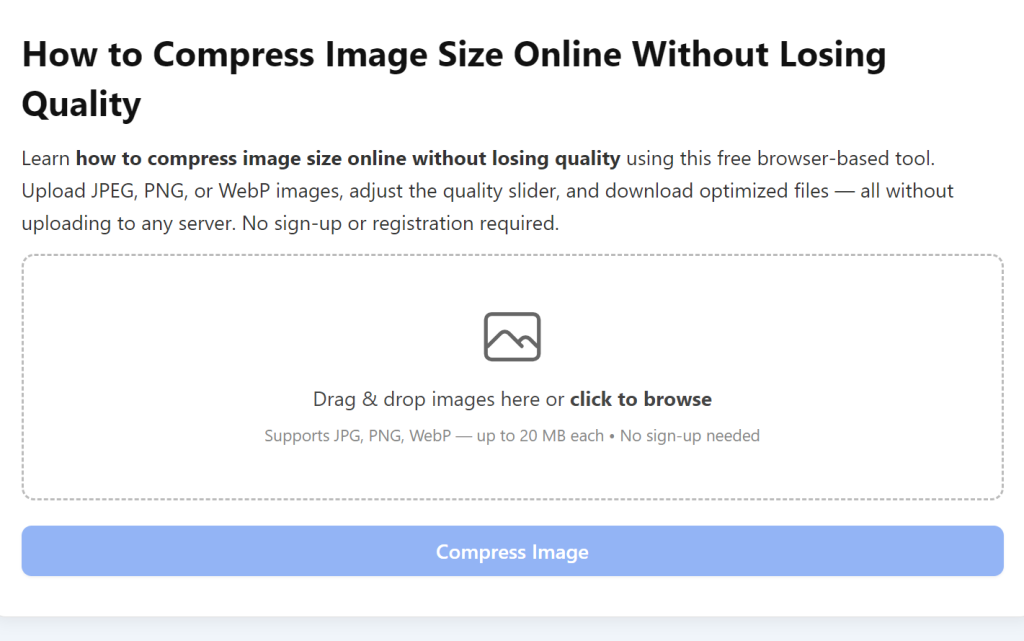
- No quality loss: Many people fear compression blurs photos, but premium bulk converters use smart lossless and lossy compression modes. You get smaller files without fuzzy edges, washed-out colors, or pixelation.
- Effortless batch processing: Instead of converting one photo at a time, bulk tools let you upload entire folders of JPGs and process them all in one go.
Step-by-Step Guide to JPG to WebP Converter Bulk Photo Compression
This workflow works for all mainstream bulk JPG to WebP compression tools, with a user-friendly process tailored for beginners. No technical skills or professional editing experience are required.
Step 1: Prepare Your JPG Image Files
First, organize all the JPG photos you want to compress and convert into a single folder on your computer or mobile device. This simple prep step makes bulk uploading seamless and avoids missing or duplicate files. Delete any blurry, duplicate, or unnecessary photos beforehand to keep your final optimized folder clean and organized.
Step 2: Upload Bulk JPG Files to the Converter
Launch your preferred JPG to WebP converter tool and locate the bulk upload section. Most tools feature a clear “Upload Files” or “Upload Folder” button. For bulk processing, always select the folder upload option instead of single file upload. This lets you import every JPG in your target folder instantly, rather than selecting individual photos one at a time. Wait a few seconds for the tool to scan and load all your images—larger batches may take slightly longer, but the process is fully automated.
Step 3: Customize Compression and Conversion Settings
This is the most important step to balance file size and image quality. Reliable bulk converters offer flexible settings to match your needs perfectly.
- Compression mode selection: Choose lossless compression if you need pixel-perfect quality for professional photos, product images, or website banners. Opt for lossy compression for casual photos, social media content, or thumbnails to maximize file size reduction.
- Quality adjustment slider: Most tools feature a 0–100 quality slider. A setting of 75–85 delivers the best sweet spot—drastic size reduction with zero noticeable quality drop.
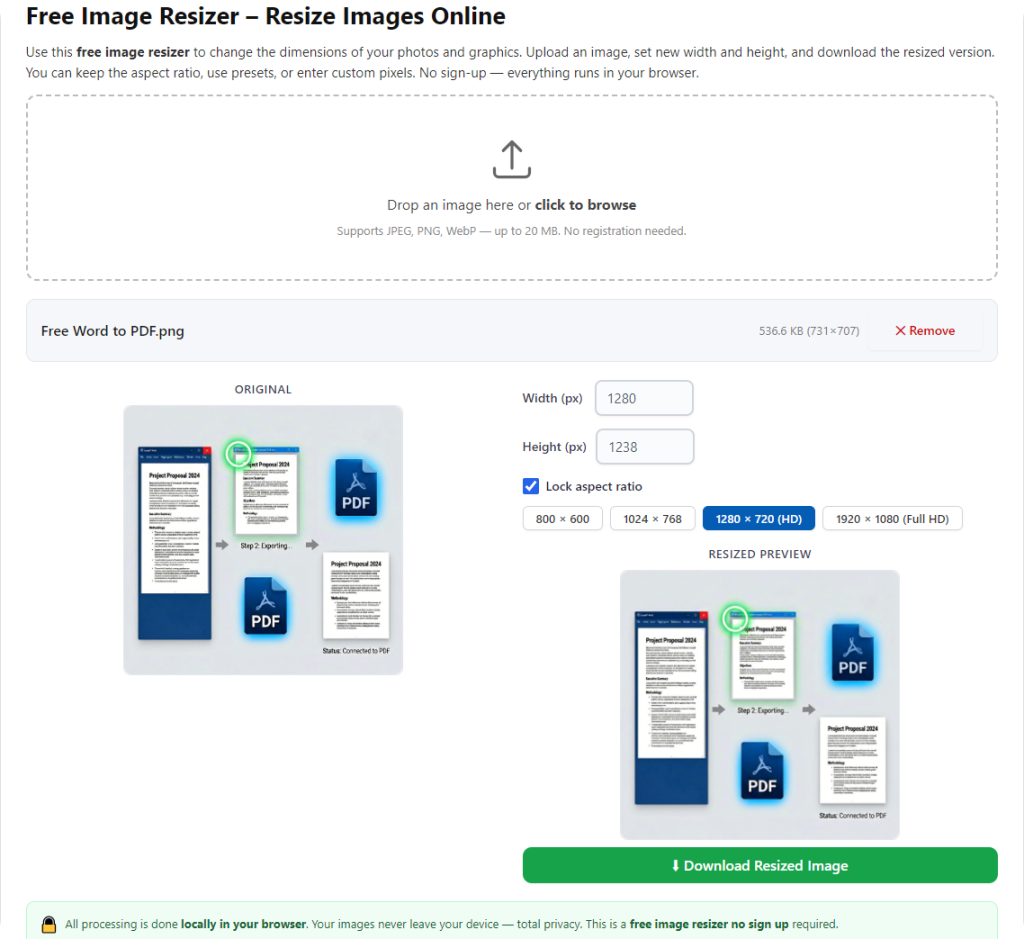
- Resize options (optional): You can lock aspect ratios to resize all bulk images to a uniform dimension, which is perfect for consistent website imagery or social media posts.
Step 4: Start Bulk Compression and Conversion
Once your settings are locked in, click the “Convert” or “Compress & Export” button to start the batch process. The tool will automatically compress and convert every uploaded JPG to WebP format in sequence. You’ll see a real-time progress bar to track completion, and you can leave the tool running in the background while you handle other tasks. Unlike manual editing, this process requires zero ongoing supervision.
Step 5: Download and Save Your Optimized WebP Files
When the bulk conversion finishes, the tool will generate a single compressed folder containing all your new WebP images. Download the full batch folder directly to your device. Always double-check a few random images to confirm the quality meets your standards—you’ll notice the files are significantly smaller while retaining sharp colors and details. From here, you can upload them to your website, social media, cloud storage, or edit them further as needed.
Top Tips for Perfect Bulk WebP Compression Results
To get the most out of your JPG to WebP bulk compression workflow, use these simple pro tips for consistent, high-quality results every time.
- Avoid over-compressing your images. Pushing the quality slider below 60 will create visible pixelation and ruin photo clarity, defeating the purpose of smart optimization.
- Always use folder uploads for batches of 10+ photos. Single file uploads defeat the time-saving benefits of bulk conversion tools.
- Test settings on a small batch first. If you’re working with high-value professional images, tweak settings on 2–3 test photos before processing your entire folder.
- Keep original JPG files backed up. Store your uncompressed original photos in a separate folder in case you need higher-resolution versions for future use.
Final Thoughts
Using a JPG to WebP Converter bulk photo compression tool is the simplest, fastest way to optimize your entire photo library for modern digital use. Whether you’re optimizing website images for faster load times, freeing up device storage, or prepping photos for social media and cloud sharing, bulk compression eliminates the hassle of manual editing. With minimal effort, you get lighter, faster, high-quality WebP images that work better across all platforms. Start using bulk JPG to WebP compression today to streamline your image workflow and elevate your digital content quality.
After learning the operation method, click the link below to enter the tool page for immediate use.