Let me ask you a quick question: have you ever tried to resize an image, only to hit a wall? You find a “free” resizer, upload your photo, resize it… and then you see it—a big, ugly watermark across the middle of your image. Or worse, the tool makes you create an account, enter your email, and jump through hoops just to download your resized picture. And don’t even get me started on the ones that ruin quality—your crisp photo turns blurry, pixelated, or stretched out, making it useless for social media, work, or personal use.
I’ve been there—so many times. I once spent 20 minutes trying to resize a product photo for an online store, using three different “free” tools. The first added a watermark, the second made me sign up with my email, and the third turned my sharp photo into a blurry mess. I was ready to give up until I found a free image resizer no watermark no login. It changed everything—no hoops, no watermarks, no quality loss, and done in 60 seconds flat.
In this guide, I’m keeping it real—no tech jargon, no confusing steps, just simple, straightforward advice from someone who’s wasted way too much time on bad image resizers. Whether you’re a content creator resizing photos for Instagram, a small business owner prepping product images, a student working on a project, or just someone who needs to resize a family photo for a frame, this guide is for you. We’ll cover why a free image resizer no watermark no login is a game-changer, how to pick the right one (no guesswork!), step-by-step instructions to resize your images perfectly, real-life scenarios you’ll actually encounter, common mistakes to avoid, and pro tips to make the process even smoother. By the end, you’ll never struggle with image resizing again.
Why a Free Image Resizer No Watermark No Login Is a Must-Have
Let’s be honest—most free image resizers are a scam. They promise “free” resizing, but then hit you with watermarks, forced logins, hidden fees, or terrible quality. That’s why afree image resizer no watermark no login is non-negotiable. Here’s why it’s the only way to go[1][7][11]:
• No watermarks = professional results: Watermarks ruin photos—whether you’re using them for work, social media, or personal projects. A free image resizer no watermark no login leaves your images clean, crisp, and ready to use, no ugly logos or text overlay[7][9][11].
• No login = zero hassle: You don’t have time to create an account, enter your email, or remember another password. A good free resizer lets you upload, resize, and download in seconds—no sign-ups, no personal info required[1][7][11].
• Preserves image quality: The best free image resizer no watermark no login uses advanced algorithms (like Lanczos 3 or bicubic resampling) to keep your images sharp and clear, even when resizing small or large[1][3][10][11]. No more blurry, pixelated messes.
• Fast and easy: Most of these tools work in your browser—no software to download, no complicated setup. Upload your image, set your dimensions, and download—done in under a minute[1][7][11].
• Private and secure: Many top tools process your images locally in your browser, meaning your photos never leave your device. No need to worry about sensitive images (like family photos or client work) being stored on a third-party server[1][7][11].
• Supports multiple formats and batch resizing: The best ones work with JPG, PNG, WebP, and other popular formats, and some even let you resize multiple images at once (batch resizing)—a lifesaver if you have dozens of photos to prep[1][7][11].
Pro tip: I used to pay for premium image resizers because I thought free ones were all bad. But once I found a reliable free image resizer no watermark no login, I canceled my subscription. It does everything I need—no watermarks, no logins, great quality—for free.
How to Pick the Right Free Image Resizer No Watermark No Login
Not all free image resizers no watermark no login are created equal. Some are slow, some ruin quality, and some secretly add watermarks (yes, really!). To make sure you pick the best one, here’s what to look for (learn from my mistakes!)[1][7][11]:
1. Explicitly says “no watermark” and “no login”: Don’t assume—check the tool’s homepage to make sure it clearly states no watermarks, no sign-ups, and no logins. If it’s vague, skip it[7][9][11].
2. Preserves image quality: Look for tools that mention advanced resampling algorithms (like Lanczos 3 or bicubic) or “quality preservation.” These will keep your images sharp, even when resizing[1][3][10][11].
3. Supports your image formats: Make sure it works with your file type—JPG, PNG, WebP, etc. Most good tools support all popular formats[1][7][11].
4. Has a preview feature: You need to see the resized image before downloading to make sure it looks right. No preview = risk of downloading a stretched or blurry image[3][5][11].
5. Offers flexible resizing options: It should let you set custom dimensions (width and height), lock the aspect ratio (to avoid stretching), and maybe even have presets for social media (Instagram, Facebook, YouTube)[1][3][8][11].
6. Fast and reliable: No one wants to wait 5 minutes for a single image to resize. Look for tools that process images in seconds, even for large files (up to 50MB or more)[1][7][11].
7. Batch resizing (nice to have): If you often resize multiple images at once (like product photos or social media posts), look for a tool that supports batch uploads—it saves so much time[7][11].
8. Mobile-friendly: You should be able to resize images on your phone or tablet, not just your computer. Most good tools are browser-based and work on any device[7][8][11].
Step-by-Step: How to Use a Free Image Resizer No Watermark No Login
Now, let’s get to the good stuff—exactly how to use a free image resizer no watermark no login. These steps are simple, even if you’re not tech-savvy. I’ll use a real example: let’s say I have a 4000x3000 pixel photo that I need to resize to 1080x1080 pixels for an Instagram post (square format), and I want to keep it sharp with no watermarks and no login.
Step 1: Prep Your Image (2 Minutes Max)
Prepping your image is quick, but it ensures your resized photo looks perfect. You don’t need fancy software—just a few quick checks[3][5][10]:
• Use the highest-quality original image: Start with the best version of your photo. If you resize a blurry image, the resized version will be even blurrier[3][10].
• Know your target dimensions: Decide how big you want your resized image to be. For social media, common sizes are 1080x1080 (Instagram post), 1080x1920 (Instagram story), 1200x630 (Facebook cover), and 1280x720 (YouTube thumbnail)[1][3][8]. For print, use inches or centimeters with 300 DPI[3][6].
• Lock the aspect ratio (critical!): This is the #1 mistake people make. If you don’t lock the aspect ratio, your image will stretch or squash—circles become ovals, people look wide or tall, and it looks unprofessional[2][5][11]. Most tools have a chain icon or checkbox to lock it—use it!
• Save a backup of the original: Always keep a copy of the original image. If you don’t like the resized version, you can start over without losing your original[3][6].
Example: My original photo is 4000x3000 pixels (aspect ratio 4:3). I want to resize it to 1080x1080 (1:1 square) for Instagram. I’ll lock the aspect ratio, resize to 1080x1080, and crop any extra space (most tools let you crop easily)[3][8].
Step 2: Open the Free Image Resizer No Watermark No Login
Open your web browser (Chrome, Safari, Edge—any works) and go to the tool you picked. You’ll see a clean, simple interface with a clear upload zone that says something like “Upload Image” or “Resize Your Image for Free—No Watermark, No Login”[1][7][11].
Pro tip: Bookmark the tool so you can access it quickly next time. No more searching for “free image resizer” and sifting through tools that add watermarks or force logins[7].
Step 3: Upload Your Image
This part is super easy—no logins, no email, just upload your image. Here’s how[1][7][11]:
•Drag and drop (computer): Click and hold your image file, drag it into the upload zone, and let go. This takes 2 seconds—perfect for busy days.
• Select manually (phone or computer): If drag and drop doesn’t work (e.g., on a phone), click the “Select File” button, navigate to your photo folder, and choose your image.
What to expect: The tool will process your image for a few seconds (10-20 seconds, max) and show you a preview of the original image, along with its current dimensions (width and height)[1][11].
Pro tip: If your image is larger than 50MB, check if the tool supports large files. Most good ones do, but if not, you can compress the image slightly first (use a free image compressor no watermark no login) to reduce the size[1][11].
Step 4: Set Your Resizing Options
This is where you customize your resized image. A good free image resizer no watermark no login will give you flexible options—here’s what to do[1][3][11]:
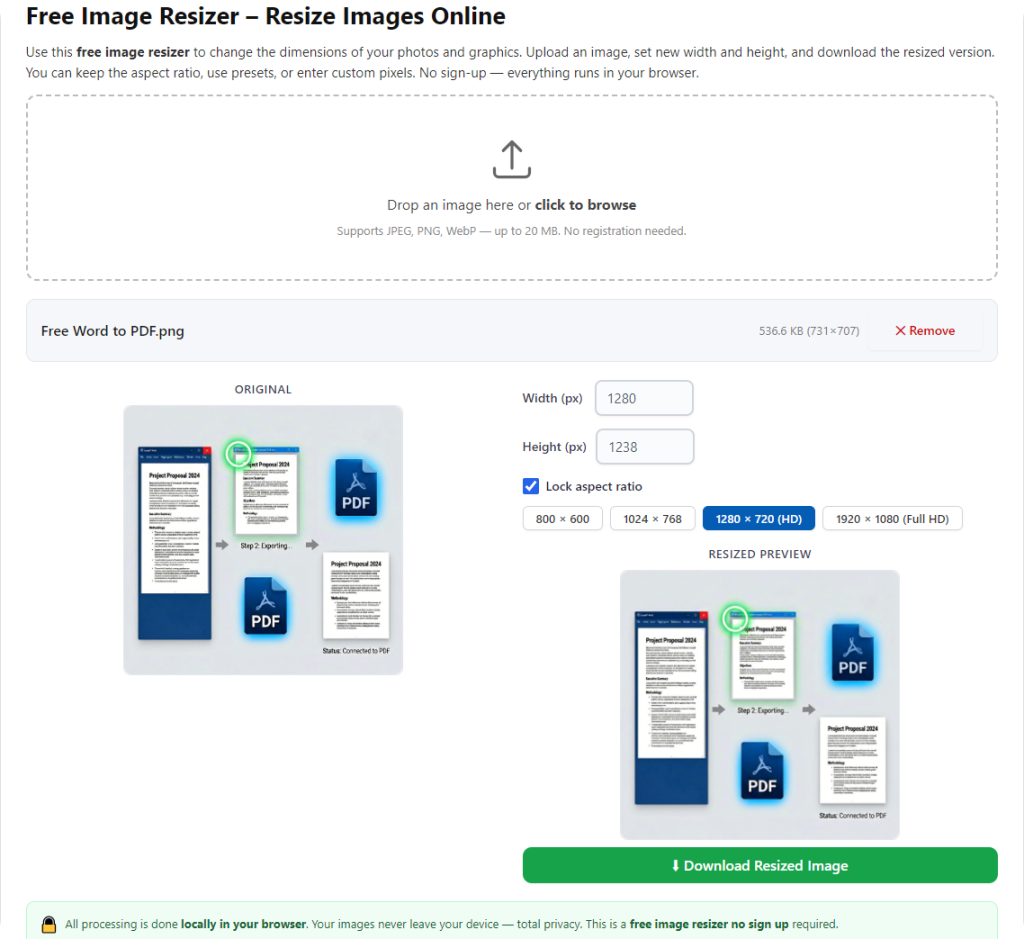
1. Lock the aspect ratio: Look for a chain icon next to the width and height fields—click it to lock. This ensures your image doesn’t stretch or squash[2][5][11].
2. Enter your target dimensions: Type in your desired width or height. Since the aspect ratio is locked, the other dimension will auto-fill. For example, if I type 1080 in the width field, the height will auto-fill to 1080 (for a square)[3][8].
3. Choose a resizing algorithm (if available): If the tool lets you pick, choose “Lanczos 3” or “Bicubic” for the best quality—these algorithms keep your image sharp[1][10][11].
4. Use presets (if needed): If you’re resizing for social media, look for presets like “Instagram Post” or “Facebook Cover”—the tool will auto-set the correct dimensions, saving you time[1][8][11].
5. Crop (if needed): If your original image’s aspect ratio doesn’t match your target (like my 4:3 photo to 1:1 square), the tool will let you crop the extra space. Drag the crop box to focus on the most important part of the image (e.g., a person’s face or a product)[3][8].
Pro tip: Don’t upscale too much! If your original image is small (e.g., 500x500 pixels) and you try to resize it to 1080x1080, it will become pixelated. Stick to downscaling (making images smaller) for best quality[5][10].
Step 5: Preview & Resize Your Image
Don’t skip this step—it’s the key to making sure your resized image looks perfect[3][5][11]:
1. Click the “Preview” button to see what your resized image will look like. Check for blurriness, stretching, or cropping issues.
2. If something’s off, adjust the dimensions or crop box and preview again. It only takes a few seconds to fix.
3. Once you’re happy with the preview, click the “Resize” button (it might say “Resize Image” or “Start Resizing”). The tool will process your image in 10-30 seconds[1][7][11].
Example: I previewed my Instagram post image and noticed the crop cut off part of the photo. I adjusted the crop box to include the whole subject, previewed again, and clicked “Resize”—perfect.
Step 6: Download Your Resized Image
You’re almost done—this is the easiest step[1][7][11]:
1. After the tool finishes resizing, click the “Download” button. It might say “Download Image” or “Save to Device.”
2. Save the resized image to a folder where you can find it easily (e.g., “Resized Images” or “Instagram Posts”).
3. Open the downloaded image and double-check it. Make sure it’s sharp, correctly sized, and has no watermarks (remember, it’s a free image resizer no watermark no login—there should be none!).
That’s it! You just resized your image for free, with no watermarks, no logins, and no quality loss. It’s that simple.
Real-Life Scenarios: Using a Free Image Resizer No Watermark No Login
Let’s put these steps into action with real scenarios you’ll actually encounter. This will show you how easy it is to use a free image resizer no watermark no login in everyday life.
Scenario 1: Content Creator Resizing for Instagram
You’re a content creator, and you have a photo of a sunset (3000x2000 pixels) that you want to post to Instagram. You need it to be 1080x1080 pixels (square) with no watermarks, and you don’t want to sign up for anything. Here’s how:
1. Prep your photo: Know your target (1080x1080), lock the aspect ratio, and save a backup.
2. Upload the sunset photo to the free image resizer no watermark no login.
3. Lock the aspect ratio, enter 1080 in the width field (height auto-fills to 1080), and crop the extra space around the sunset.
4. Preview to make sure the sunset is centered, then click “Resize.”
5. Download the resized image and post it to Instagram[8][11]. Your photo looks crisp, has no watermarks, and is perfectly sized for the platform.
Scenario 2: Small Business Owner Resizing Product Photos (Batch)
You own a small online store, and you have 15 product photos (all 4000x4000 pixels) that you need to resize to 800x800 pixels for your website. You don’t have time to resize them one by one, and you don’t want watermarks or logins. Here’s how:
1. Prep your photos: Save backups, know your target (800x800), and make sure all are JPG/PNG.
2. Open the free image resizer no watermark no login that supports batch resizing.
3. Upload all 15 product photos at once (use the “Batch Upload” button)[7][11].
4. Lock the aspect ratio, enter 800 in the width field, and select “Lanczos 3” for quality.
5. Click “Resize All” and wait for the tool to process all photos (30-60 seconds).
6. Preview a few to check quality, then download all (some tools let you download as a zip file)[11].
7. Upload the resized photos to your website. Done in minutes—no watermarks, no logins, and all photos are consistent[7][11].
Scenario 3: Student Resizing a Project Image
You’re a student, and you have a 2500x1800 pixel image for a school project. Your teacher requires it to be 1200x900 pixels (4:3 aspect ratio) with no watermarks. Here’s how:
1. Prep your image: Check the aspect ratio (2500x1800 is ~4:3), lock it, and save a backup.
2. Upload the image to the free resizer.
3. Lock the aspect ratio, enter 1200 in the width field (height auto-fills to 900), and preview.
4. Click “Resize” and download the image.
5. Insert the resized image into your project. It’s sharp, correctly sized, and has no watermarks—perfect for your assignment[3][11].
Scenario 4: Resizing a Photo for Print
You have a family photo (3000x2000 pixels) that you want to print as a 4x6 inch photo. You need to resize it to 1200x1800 pixels (300 DPI) for high-quality print, with no watermarks or logins. Here’s how:
1. Prep your photo: Know your target (1200x1800 pixels, 300 DPI), lock the aspect ratio (4x6 = 2:3), and save a backup[3][6].
2. Upload the photo to the free resizer.
3. Switch units to “inches,” set width to 4 and height to 6 (300 DPI), lock the aspect ratio.
4. Preview to make sure the photo is correctly sized, then click “Resize.”
5. Download the image and send it to the print shop. Your printed photo will be sharp and high-quality[3][6][10].
Common Mistakes to Avoid When Using a Free Image Resizer No Watermark No Login
I’ve made every single one of these mistakes—learn from me so you don’t waste time or ruin your images[5][10][11]:
1. Not locking the aspect ratio: This is the #1 mistake. If you don’t lock it, your image will stretch or squash, making it look unprofessional. Always click the chain icon[2][5][11].
2. Upscaling too much: Resizing a small image to be larger than its original size will make it pixelated. Stick to downscaling (making images smaller) for best quality[5][10].
3. Ignoring the preview: Don’t download the resized image blindly—preview it first! Check for blurriness, cropping issues, or stretching. It takes 10 seconds and saves you from redoing it[3][5][11].
4. Using a tool that lies about “no watermarks”: Some tools say no watermarks but add tiny ones in the corner. Test with a small image first to make sure[7][9].
5. Forgetting to save the original image: If you don’t like the resized version, you’ll need the original to try again. Always save a backup[3][6].
6. Using the wrong resizing algorithm: Avoid “Nearest Neighbor” algorithm—it’s fast but makes images pixelated. Use “Lanczos 3” or “Bicubic” for sharp results[10][11].
7. Resizing a blurry original image: You can’t fix a blurry image by resizing it. Start with the sharpest original possible[3][10].
Pro Tips to Master the Free Image Resizer No Watermark No Login
Now that you know how to use a free image resizer no watermark no login, these pro tips will make the process even smoother and ensure perfect results every time[3][7][10][11]:
1. Use standard dimensions for social media: Save time by memorizing common sizes (1080x1080 for Instagram posts, 1080x1920 for stories) or use the tool’s presets[1][8][11].
2. Compress images after resizing (if needed): If your resized image is still too big for email or web, use a free image compressor no watermark no login to reduce the file size without losing quality[11].
3. Test with a small image first: If you’re resizing an important image (like a client photo or project image), test the tool with a small, non-important image first to make sure it works[7][11].
4. Clear your browser cache if the tool is slow: Sometimes, browser cache slows down the tool. Clear it, and uploads/resizing will be faster[7].
5. Use local processing tools for sensitive images: For private photos (like family photos or confidential client work), use a tool that processes images locally in your browser—your photos never leave your device[1][7][11].
6. Resize multiple images at once: If you have dozens of images to resize, use a tool with batch resizing—it saves hours of tedious work[7][11].
7. Adjust image quality settings (if available): For JPG images, most tools let you adjust quality (80-85% is perfect for web/social media). Higher quality = larger file size; lower quality = smaller file size[3][10].
Frequently Asked Questions (FAQ) – Free Image Resizer No Watermark No Login
Q: Is there really a free image resizer no watermark no login that works well? A: Yes! The best ones are 100% free, no watermarks, no logins, no hidden fees, and preserve image quality. You just have to pick the right one[1][7][11].
Q: Will my resized image lose quality? A: No—if you use a good free image resizer no watermark no login with advanced algorithms (Lanczos 3 or Bicubic), your image will stay sharp. Just avoid upscaling too much[1][10][11].
Q: Can I resize multiple images at once with a free image resizer no watermark no login? A: Yes—many top tools support batch resizing. You can upload multiple images, set your dimensions once, and download them all at once[7][11].
Q: Can I use it on my phone? A: Yes! Most free image resizers no watermark no login are browser-based and work on phones, tablets, and computers. No app download needed[7][8][11].
Q: What’s the maximum file size I can resize? A: Most good tools handle images up to 50MB or more. If your image is larger, compress it first with a free image compressor[1][11].
Q: What if the resized image is stretched or blurry? A: Check if the aspect ratio is locked (fixes stretching) and make sure you’re not upscaling too much (fixes blurriness). Adjust and try again[5][10][11].
Q: Do these tools work with all image formats? A: Most work with JPG, PNG, WebP, and other popular formats. Check the tool’s homepage to confirm it supports your file type[1][7][11].
Final Thoughts – Free Image Resizer No Watermark No Login Makes Resizing Easy
Resizing images shouldn’t be a hassle. The whole point of a free image resizer no watermark no login is to save you time, avoid frustration, and give you high-quality, watermark-free images—no logins, no hoops, no tricks.
The key takeaway? Stop wasting time on tools that add watermarks, force you to sign up, or ruin your images. With the right free image resizer no watermark no login and the simple steps in this guide, you can resize any image in minutes—no stress, no hassle.
I’ve been using this method for years, and it’s saved me countless hours. Whether I’m resizing social media photos, product images, or personal photos, it works every time. Once you find a good free image resizer no watermark no login, you’ll wonder how you ever resized images without it.
So next time you need to resize an image, don’t stress. Grab a free image resizer no watermark no login, follow the steps in this guide, and get the job done fast. Your images will be sharp, watermark-free, and perfectly sized—all for free, with no logins required. Start resizing now!
After learning the operation method, click the link below to enter the tool page for immediate use.