Sharing photos online has become a daily routine for creators, small business owners, community admins, and casual social media users. Every time you upload a group snapshot, event photo, or candid street shot, you risk exposing other people’s identifiable facial features to public audiences.
Many people don’t realize posting unedited photos with clear faces violates basic digital privacy standards. Friends, strangers, minors, and clients may not consent to having their likenesses visible across public feeds and online platforms.
Manually editing photos with complex desktop software takes hours of practice. Downloading heavy editing programs just to cover a few faces creates unnecessary hassle for quick online sharing tasks.
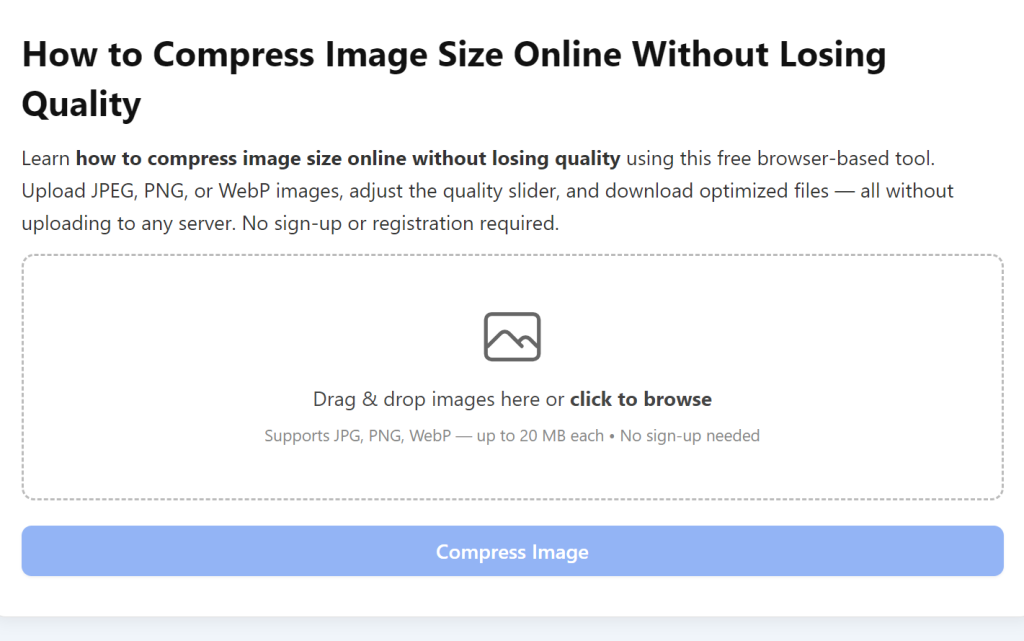
Learning how to use image blur tool to hide faces online eliminates all these privacy and workflow headaches. Web-based blur editors run directly in your browser, require no software installs, and let you obscure recognizable facial features in just a few clicks.
This complete hands-on tutorial breaks down the risks of unblurred public photos, core advantages of browser-based blur tools, essential editor features, common real-world use cases, and a full step-by-step workflow to master face censoring online.

Common Privacy Risks of Posting Unblurred Faces in Online Photos
Before diving into tool operation, it’s critical to understand why hiding faces in digital images is non-negotiable for responsible online posting. Most casual creators overlook these avoidable privacy hazards until issues arise.
Unconsented facial exposure for minors
Children’s faces shared publicly without guardian approval carry major privacy and safety risks. Public photos with clear kid faces can be scraped, reposted, or misused by unknown third parties across the web.
Legal and reputational trouble with adult subjects
Adults have the right to opt out of public digital appearances. Posting their clear faces without permission can lead to complaints, content takedowns, or formal privacy-related disputes on social platforms.
Time wasted on complicated desktop editing software
Traditional photo editing programs demand file downloads, installation setups, and advanced skill to draw blur masks over faces. These long workflows delay your posting schedule significantly.
Limited mobile editing quality
Basic built-in phone editors offer weak blur effects. They often leave partial facial details visible, failing to fully obscure identifying features for safe public sharing.
Inconsistent blur coverage across multiple photos
When editing batches of event or group photos manually, it’s easy to miss individual faces. Uneven, incomplete blurring leaves partial recognizable details exposed to online viewers.
Key Benefits When You Master How to Use Image Blur Tool to Hide Faces Online
Once you fully grasp how to use image blur tool to hide faces online, your entire photo sharing workflow becomes faster, more private, and far less stressful for every type of online content creator.
Zero software downloads or device storage usage
Every reliable online image blur tool operates entirely within your web browser. There are no large install files, no app updates, and no storage space consumed on laptops, tablets, or mobile phones.
Instant one-click facial detection for fast editing
Top web blur editors automatically scan uploaded images to locate human faces. This feature cuts down manual mask drawing work, making bulk photo editing far more efficient.
Multiple customizable blur styles for full privacy control
These online tools offer standard soft blur, heavy pixelation, solid black block censoring, and mosaic effects. You can pick the intensity level that fully erases all recognizable facial details every time.
Works on every device with a working web browser
Whether you edit on a desktop computer, cheap laptop, smartphone, or tablet, the online blur tool functions identically. You can censor faces anywhere with basic internet access.
Preserves the rest of your original photo quality
Only the selected facial regions receive blur treatment. Background scenery, text, logos, and other non-identifying elements remain crisp and unaltered for clean, natural-looking final images.
Eliminates privacy violations on social and community platforms
When you consistently blur all unconsented faces before upload, you avoid content removal, account restrictions, or complaints from people featured in your group and candid shots.
No mandatory account creation for basic blur functions
Most accessible web-based blur tools let users upload, edit, and download modified photos without signing up for accounts. This adds an extra layer of personal privacy during your editing sessions.
Must-Have Features in a Quality Online Image Blur Tool for Hiding Faces
Not all browser-based photo editors deliver reliable face censoring results. As you learn how to use image blur tool to hide faces online, prioritize tools that include these creator-focused, privacy-first core features.
Automatic AI facial recognition detection
The most valuable feature is built-in face scanning. The tool pinpoints every human face in your uploaded photo automatically, so you do not need to trace facial outlines manually.
Adjustable blur intensity sliders
Look for a customizable intensity control. Light blur works for subtle privacy softening, while maximum pixelation completely erases all eye, nose, mouth, and jawline identifying details.
Custom brush and mask sizing tools
For off-center faces, partial facial cropping, or small distant portraits, adjustable brush sizes let you perfectly fit blur masks to every unique face shape in your image.
Multiple blur effect modes
Standard Gaussian soft blur, heavy mosaic pixelation, solid opaque black blocks, and gradient blur layers give you full creative control over how you censor facial features for different posting scenarios.
Batch photo upload and bulk face blurring
If you edit dozens of event or group photos at once, batch processing functionality saves hours of repetitive single-image upload and editing work each session.
High-resolution output downloads
Premium web blur tools export edited photos in full original resolution. Compressed, low-quality exports defeat the purpose of professional content creators sharing clear, polished visual posts.
Undo, redo, and reset canvas controls
Mistakes happen while masking faces. Simple undo buttons let you erase incorrect blur selections instantly without reuploading your original photo file from scratch.
Support for all common image file formats
The tool should accept JPG, PNG, and standard image file types. Compatibility issues force users to convert photos before editing, adding extra unnecessary steps to your workflow.
Real-World Use Cases for Online Face Blur Image Tools
The skill of understanding how to use image blur tool to hide faces online applies to countless personal, business, community, and creative online content scenarios that demand strict facial privacy protection.
Social media group event photography
Birthday parties, volunteer meetups, local community gatherings, and hobby group shots often feature dozens of unfamiliar people. Blur all unconsented faces before posting these group images to public feeds.
Street photography and candid urban content
Street creators capture candid shots of pedestrians for blog, reel, or gallery content. Online blur tools quickly obscure random passersby’s faces to comply with digital privacy guidelines across platforms.
Small business customer testimonial photos
Local shop owners, service providers, and freelancers often snap candid client photos for marketing content. Many customers decline full public visibility, requiring fast face blurring before promotional posting.
Classroom and youth organization activity snapshots
Teachers, youth group leaders, and after-school program admins must protect minor students’ privacy. Blur all child faces in classroom and activity photos shared to parent groups or public pages.
News and community forum image uploads
Local forum moderators and citizen journalists share incident, community, and public event photos. Hiding civilian witness faces prevents unwanted public identification and privacy breaches.
Personal travel and vacation candid snapshots
Tourists capture random strangers in landmark and travel photos. Blurring unknown faces lets creators share travel content online without exposing other travelers’ likenesses to global audiences.
Medical, nonprofit, and sensitive support content
Charity and wellness organizations share behind-the-scenes program photos featuring participants. Full facial pixelation protects vulnerable people’s identities in public outreach materials.
Step-by-Step Full Tutorial: How to Use Image Blur Tool to Hide Faces Online
Follow this straightforward, browser-native workflow to master how to use image blur tool to hide faces online, complete with privacy best practices for every editing stage.
Step 1: Sort and prepare your original photo files
Gather all photos you plan to edit in one easy-to-access folder on your device. Separate group shots, candid street photos, and client images so you can process them in organized batches.
Quickly scan each photo to note how many distinct human faces appear. This rough count helps you verify no facial feature gets missed during the blur editing stage later.
Step 2: Open your chosen web-based image blur tool
Launch the editor directly through your standard web browser. No installers, app packages, or setup wizards will load before you reach the main photo upload workspace.
Spend ten seconds locating core navigation panels: the upload button, facial detection toggle, blur intensity slider, effect mode menu, and final download export button on the main screen.
Step 3: Upload your target photo to the online editor
Click the upload icon and select one or multiple image files from your device storage. Wait a brief moment for the full-resolution photo to render inside the browser editing canvas.
If the tool supports drag-and-drop functionality, you can also drag photo files directly onto the editor window for faster upload speeds during bulk editing sessions.
Step 4: Activate automatic face detection scan
Locate the labeled “detect faces” toggle or button on the sidebar menu and select it. The tool’s built-in AI will instantly draw faint outline boxes around every recognizable human face in your uploaded image.
Review all auto-generated face boxes carefully. Zoom in on distant background figures to confirm no small or partially obscured faces failed to register during the automated scan.
Step 5: Customize blur style and intensity settings
Open the blur effect dropdown menu to pick your preferred censoring method. Soft Gaussian blur works for low-key privacy edits, while heavy mosaic pixelation delivers full unidentifiable coverage for sensitive content.
Drag the intensity slider to adjust how thick the blur overlay appears over facial features. Max intensity completely erases eyes, eyebrows, nose structure, mouth, and jawline details from view.
Step 6: Add or adjust blur masks manually for missed faces
If any faces did not register in the auto-detection scan, select the manual blur brush tool. Resize the brush diameter to perfectly match the size of the unmarked facial outline on your photo.
Click and drag your cursor across every unrecognized face to draw a full blur mask covering the entire forehead down to the chin, including both ear regions for complete privacy coverage.
Step 7: Fix accidental blur overlaps with undo controls
If you drag the blur brush over clothing, background scenery, or non-identifying body parts by mistake, use the undo button to remove the misplaced blur layer instantly.
You can also use the erase sub-tool to trim blur edges that extend outside facial boundaries for a cleaner, more natural finished photo appearance.
Step 8: Preview the final censored image at full zoom
Zoom your canvas view to 100% full resolution and scan every face in the photo one more time. Double-check that zero partial facial details remain visible through the blur overlay.
For high-sensitivity content featuring minors or private clients, switch to maximum pixelation mode to guarantee no facial feature can be distinguished by online viewers.
Step 9: Export and download your edited privacy-safe photo
Locate the download or export button at the top or bottom of the editing workspace. Select your desired output file format, such as standard JPG or lossless PNG for clear visual content.
Save the finished edited photo into a separate dedicated folder labeled “blurred privacy-safe photos” to avoid mixing unedited original shots with your upload-ready files.
Step 10: Repeat workflow for all remaining photos in your batch
Return to the upload panel and load your next group of unedited images. Reuse your saved blur intensity and effect settings for consistent privacy styling across your entire photo collection.
Once all photos finish editing, you can immediately upload the fully blurred versions to social feeds, community groups, marketing pages, or online forums without privacy risk.
Common Mistakes to Avoid When Using Online Blur Tools to Hide Faces
Even after learning how to use image blur tool to hide faces online, these frequent editing errors can leave critical facial details exposed and create digital privacy risks for your content.
Relying solely on auto face detection without manual review
AI scanning software occasionally misses distant, tilted, partially covered, or small background faces. Skipping a full manual zoom review guarantees unblurred facial features slip through your edits.
Using low-intensity soft blur for sensitive minor or client photos
Light subtle blur still lets viewers distinguish distinct facial shapes and features. Always select maximum pixelation for any photo featuring children, private clients, or vulnerable participants.
Only blurring part of a person’s facial structure
Many new editors mask just the eye area and leave mouth, jaw, or full forehead unobscured. Partial blurring still leaves enough identifying detail to recognize the featured person online.
Forgetting batch processing limits during large photo sets
Some free online blur tools cap single-session upload quantities. Attempting to upload fifty photos at once can crash the browser tab and erase all your in-progress blur edits.
Downloading low-compression small-resolution edited files
Small compressed exports appear grainy and unprofessional on social feeds. Always select full original resolution during the download step for polished, usable public content.
Mixing inconsistent blur styles across a photo series
Shifting between soft blur, black blocks, and mosaic pixelation in one set of event photos creates disjointed, unpolished visual branding for creator and business pages.
Closing the browser tab before downloading edited images
Web-based editors store blur layers temporarily in browser memory. If you close the window before exporting, all your masking edits disappear and you must reupload and reprocess the original photo again.
Pro Optimized Tips to Master Online Face Blur Editing Fast
Use these actionable creator strategies to streamline your workflow every time you learn and apply how to use image blur tool to hide faces online for consistent, privacy-compliant photo edits.
- Bookmark your preferred online blur tool in your browser bookmarks bar. This lets you launch the editor in one click before every photo upload session without repeated search steps.
- Save a preset maximum pixelation intensity setting for all high-sensitivity photos featuring minors, private clients, or vulnerable community participants to standardize privacy coverage.
- Process photos in small batches of five to eight images at a time. Small upload groups prevent browser lag, crashes, and lost blur mask edits during large editing projects.
- Zoom the editing canvas to full resolution after every blur mask application. This quick check catches thin gaps in blur coverage around hairlines and jaw edges instantly.
- Separate original unedited photos and finished blurred exports into two distinct device folders. This eliminates accidental upload of unredacted photos to public online platforms.
- Test multiple blur effect modes on one sample photo before bulk editing a full collection. This lets you lock in a uniform visual style for your entire content series upfront.
- Use the manual blur brush tool for close-up portrait shots where auto-detection outlines cut off parts of cheeks or foreheads for complete full-face coverage.
- Clear your browser cache periodically if the editor starts lagging during long batch blur sessions to maintain fast upload and mask rendering speeds.
Final Closing Thoughts
Digital privacy standards continue to tighten across every major social media, forum, and content sharing platform. Uncensored facial imagery posted publicly creates avoidable complaints, content removal, and even reputational harm for casual and professional creators alike.
Desktop editing software creates unnecessary barriers for quick, on-demand photo redaction. Complex installation processes and steep learning curves waste valuable time that creators could spend building and sharing original visual content online.
A reliable web-based blur editor solves all these pain points, and fully understanding how to use image blur tool to hide faces online turns complicated privacy editing into a fast, repeatable browser workflow accessible on every internet-connected device.
With adjustable blur intensity, automated AI face scanning, batch photo support, and zero software installation requirements, these online tools fit every creator, small business, educator, and community admin’s daily photo editing needs.
By following the complete step-by-step tutorial, avoiding common editing mistakes, and applying the expert efficiency tips outlined above, you can consistently produce fully privacy-redacted photos ready for safe public sharing across all online channels with minimal time investment.
After learning the operation method, click the link below to enter the tool page for immediate use.