If you love creating retro-style graphics, custom game sprites, cute profile avatars, or vintage pixel artwork, you’ve definitely hunted for a reliable online tool before. I’ve been exactly where you are, scrolling through endless tool lists, testing one platform after another, and walking away disappointed every single time.
Early on, I thought all free pixel art tools were basically the same. I figured they all let you draw pixel grids, pick colors, and download your finished art. Boy, was I wrong. I ran into so many frustrating issues that ruined my creative flow and wasted hours of my time.
Some tools locked basic canvas sizes behind paywalls. Others slapped huge watermarks all over my finished designs. A few had glitchy interfaces that lagged mid-drawing, erased my work randomly, or crashed entirely before I could save. I even tried tools that advertised “free access” but forced mandatory sign-ups just to export a simple PNG file.
What frustrated me most, though, was converting actual photos to pixel art. Most basic pixel tools only let you draw from scratch. They don’t have a proper photo import and conversion function at all. I’d upload a personal photo hoping for a quick retro pixel makeover, only to get a distorted, blurry mess with no adjustable settings.
After dealing with all these messy, low-quality platforms, I started researching and practicing repeatedly to nail the perfect process. Today, I’m breaking down exactly how to use image pixel art maker to convert photos with my personal tested workflow, real mistakes to avoid, and pro tips nobody tells beginners.
This is pure hands-on creator experience, no generic AI fluff, no sponsored tool pushes, just honest step-by-step guidance that actually works for real photo conversions.
Why Regular Photo Editors Fail at Pixel Art Conversions
A lot of new creators make the mistake of using standard photo editing apps to turn regular pictures into pixel art. I’ve definitely done this too, thinking a quick filter would give me that clean retro pixel look I wanted.
It never works out right. Generic photo editors are built for smooth gradients, soft blending, modern color grading, and high-resolution photo polishing. They’re not programmed for rigid pixel grid structure, sharp pixel boundaries, or limited retro color palettes.
When you use a regular filter to pixelate a photo, you get messy anti-aliasing, blurred edges, washed-out colors, and uneven pixel blocks. It looks like a low-quality blur effect, not authentic vintage pixel art.
I used to settle for these bad results for months. I thought pixel art conversion was just a lazy filter effect. I had no idea there was a proper method and dedicated toolset that completely changes the final output.
A true retro pixel art photo converter tool doesn’t just blur your image. It maps your original photo’s colors, shapes, and shadows onto a precise pixel grid. It removes unnecessary gradients, restricts color ranges, and locks in sharp pixel definition for that classic retro gaming aesthetic.
Key Benefits of Using a Dedicated Image Pixel Art Maker for Photos
You might wonder why you need a specialized tool just to convert a simple photo. Trust me, the difference in quality is night and day once you start using the right platform.
First, you get full creative control over every detail. Basic filter tools give you zero customization. You click one button and get whatever generic result the algorithm spits out. A dedicated pixel art maker lets you adjust grid size, color palettes, contrast, sharpness, and detail levels manually.
Second, you achieve authentic retro styling. Real pixel art relies on limited color schemes and rigid grid alignment. Dedicated tools include vintage palettes like Game Boy, PICO-8, and classic 8-bit and 16-bit game colors. This is how you get true high-quality pixel art photo transformation instead of lazy pixelation.
Third, you preserve important photo details. I’ve lost so many good photo compositions to bad converters that erase facial features, background details, and shadow depth. The right tool balances simplification and detail retention perfectly.
Fourth, you get clean, usable exports. No watermarks, no forced compression, no awkward white backgrounds. You can turn personal portraits, landscape shots, and hobby photos into professional pixel assets for social media, game design, or personal art projects.
Must-Have Tool Features for Photo-to-Pixel Conversions
Before jumping into the step-by-step process, I want to cover the critical features your pixel art maker needs for successful photo conversions. If your tool lacks any of these, your results will always look amateurish.
First, direct photo import functionality. This sounds obvious, but many pixel art tools are only manual drawing platforms with zero photo upload support. Always confirm your tool supports image import before starting your project.
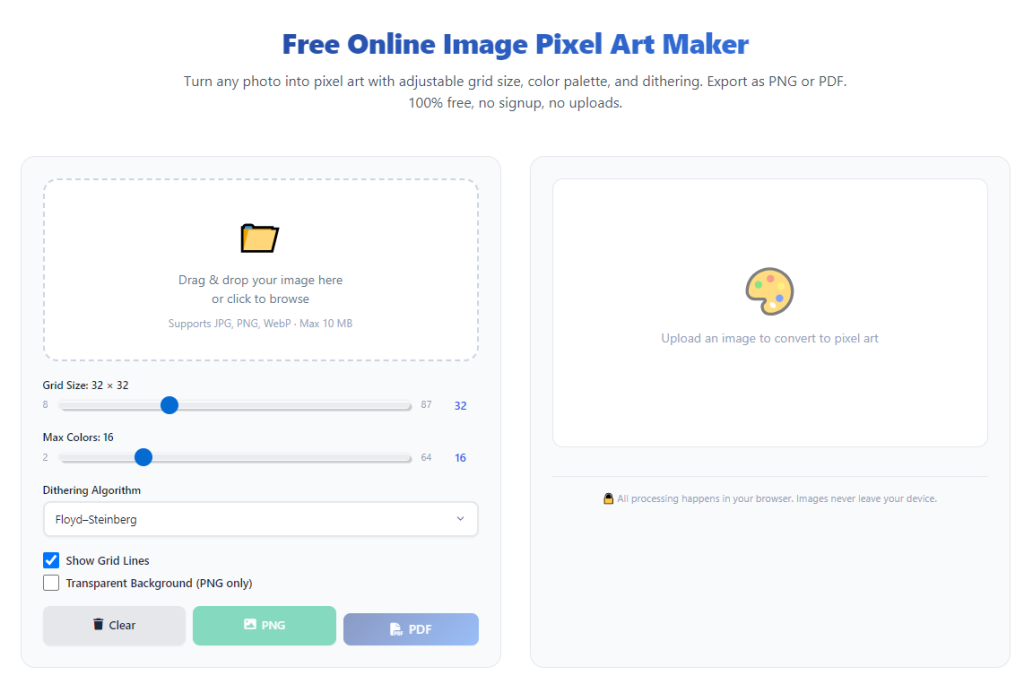
Second, adjustable pixel grid resolution. Different photos need different grid sizes. Portraits work great on 32x32 or 64x64 grids, while wide landscape photos need larger canvases for clarity. Flexible sizing prevents cramped, unreadable pixel art.
Third, retro preset color palettes. These pre-built limited color sets are what sell the vintage look. Without them, your converted photo will just look like a blocky, faded version of the original instead of intentional pixel artwork.
Fourth, manual detail adjustment sliders. Being able to tweak sharpness, shadow depth, and color saturation lets you refine auto-generated conversions. Auto modes are never perfect, and manual tweaks make your art unique.
Fifth, transparent PNG export options. This is essential if you’re making avatars, sprites, or overlay graphics. For standard photo art, high-quality JPG exports work perfectly too.
How to Use Image Pixel Art Maker to Convert Photos (Beginner Step-by-Step Workflow)
This is my full refined process I’ve built after dozens of failed attempts and successful conversions. It’s casual, easy to follow, and designed specifically for anyone new to photo pixel transformation. This is exactly how I consistently create clean, retro pixel art from regular photographs.
Step 1: Open a Reliable No-Signup Pixel Art Maker
Start by launching your preferred browser-based pixel art maker. Skip any tools that force account creation, hide conversion settings behind paywalls, or flood the screen with pop-up ads. You want a clean, focused platform built for both manual drawing and photo conversion.
I always stick to free, instant-access tools because creative flow dies the second you have to stop and verify emails or upgrade plans mid-project.
Step 2: Import Your Original Photograph
Locate the photo import or upload button and select the picture you want to convert. I recommend using high-quality, clear original photos. Blurry, low-resolution source images will always produce weak pixel art results, no matter how good your tool is.
For beginners, start with simple compositions. Portraits with plain backgrounds, simple landscape shots, or single-subject photos work best for your first few tries. Busy, cluttered photos are harder for auto-conversion algorithms to simplify cleanly.
Step 3: Select Your Ideal Pixel Grid Size
This step makes a massive difference in your final look, and most new users skip it entirely. Match your grid size to your photo’s purpose.
Small profile avatars and game sprites work perfectly on 32x32 or 48x48 grids. Detailed art pieces, wallpaper designs, and landscape conversions need 64x64 or larger grids to retain readable details.
I used to always pick the largest grid by default, but that makes your pixel art look too busy and defeats the retro minimalist vibe. Smaller grids force clean simplification that defines classic pixel style.
Step 4: Apply a Retro Color Palette
Once your photo is mapped to the grid, apply a vintage color preset. Start with classic 8-bit or 16-bit palettes for timeless results. If you want custom vibes, tweak individual color tones manually.
This step instantly transforms a basic blocky photo into authentic retro artwork. Without palette restriction, your converted photo retains too many modern gradient colors and looks unfinished.
Step 5: Manually Refine Auto-Generated Pixels
Auto-conversion is never 100% perfect. Trust me, I’ve tried hundreds of auto-only conversions, and they always leave stray pixels, misplaced colors, or blurred details.
Take two or three minutes to clean up your canvas. Use the pixel pencil to fix misplaced color blocks, the eraser to remove stray pixels, and the fill tool to solidify inconsistent color areas. This quick manual pass separates amateur conversions from professional-looking pixel art.
This is also where you customize your custom pixel art from personal photographs. You can brighten key features, darken shadows, or even add tiny decorative pixel details to make your piece one-of-a-kind.
Step 6: Adjust Sharpness and Detail Levels
Tweak your tool’s detail and sharpness sliders to balance clarity and retro simplicity. Too much detail makes it look like a blurry photo filter. Too little detail erases recognizable features from your original picture.
I usually lower subtle gradient details slightly while boosting edge sharpness. This keeps your subject recognizable while fully embracing classic pixel art aesthetics.
Step 7: Preview and Export Your Final Pixel Art
Zoom out and preview your full design to check for messy areas or uneven coloring. Once you’re happy with the look, export your finished piece in your preferred format.
Use transparent PNG for avatars and sprites, and standard high-quality JPG for wall art, social posts, and personal collections. Stick to no-watermark pixel photo conversion workflow tools to ensure clean, unmarked exports every time.
Common Photo Conversion Mistakes (I’ve Made All of These)
To save you the trial and error I went through, I’m sharing the most frequent mistakes that ruin photo-to-pixel conversions. These are the exact errors that made me redo entire projects early on.
First, using low-quality source photos. Blurry screenshots, compressed social media images, and dark photos never convert well. Always start with a crisp, well-lit original file for the best results.
Second, skipping palette restriction. Users often keep full modern color ranges and wonder why their art doesn’t look retro. Limited vintage colors are mandatory for authentic pixel styling.
Third, over-relying on auto-conversion. Automation is a great starting point, but manual cleanup is non-negotiable. Auto tools always leave tiny inconsistencies that stand out in finished art.
Fourth, choosing the wrong grid size. Oversized grids look cluttered; undersized grids erase all recognizable details. Matching grid size to your project purpose is key for easy photo to pixel art conversion for beginners.
Best Real-World Uses for Converted Photo Pixel Art
One of my favorite parts of this process is how versatile your finished artwork becomes. Once you master how to convert photos properly, you’ll find endless creative uses for your new pixel pieces.
Personal social media avatars and profile pictures are my most common use case. Converting your portrait to retro pixel style gives you a unique, eye-catching profile that stands out from generic filtered photos.
Indie game developers use photo conversions to create custom character sprites, background tiles, and menu graphics. You can turn reference photos into original game assets quickly without drawing everything from scratch.
Creative hobbyists turn vacation photos, pet pictures, and family portraits into custom retro wall art. It’s a fun, unique way to preserve memories with a vintage artistic twist.
Content creators use pixel-converted photos for custom thumbnails, channel icons, and graphic overlays. The retro style is super popular and helps content feel distinct and creative.
Final Thoughts
Learning how to use image pixel art maker to convert photos completely upgrades your creative toolkit. You no longer need to rely on lazy photo filters, pay for expensive design software, or settle for low-quality pixelated images.
With the right free tool and this simple, refined workflow, anyone can turn ordinary photographs into clean, authentic retro pixel art. The process is beginner-friendly, fast, and endlessly customizable to match your personal creative style.
Stop wasting time on glitchy, limited editors and generic filters. Master photo-to-pixel conversion today, and unlock a whole new style of unique, vintage artwork from your personal photo collection.
After learning the operation method, click the link below to enter the tool page for immediate use.